BLOG

Photography has changed the way I see the world around me.

Through it I discover new things and rediscover old ones. Like my island, New Caledonia.

This blog is just me sharing my world through my photography.

Hope you enjoy.

Posts tagged long exposure
ROUND ABOUT A GOOD LIFE

This is the first time I’ve been out shooting since the end of lockdown. It felt good to be out concentrating and putting my total attention on one thing. I’ve wanted to photograph this roundabout for a long time now, well, since 2016 after I successfully captured the Ko We Kara roundabout for a local contest. I finally got my image but…

… the view point is all wrong. I think the better spot, and I can’t confirm this as it’s in a closed off area, would be on top of the hill located on the other side of the roundabout to the left. From that vantage point I’d have a view of the roundabout and the Belle Vie shopping mall behind it and not to the right, out of sight, like in this image. I will check that hill out again in hopes of finding a spot to reshoot this roundabout.

Belle Vie roundabout is a major intersection in Noumea. From it you can head into the city, the southern suburbs, northern suburbs or head out of the Noumea altogether. To the left, just out of sight, is the Néobus depot, our new bus line that runs from Koutio to the City centre. To the right, just out of sight as well, is the Belle Vie shopping mall. In the mid-right of the roundabout is Magenta Discount and Magenta Bazar. Behind the trees and roundabout is Cheval Distribution, a pet and animal shop. Beyond the left and right of the image are petrol stations and cemeteries. Check out this blog post for a photo of the beautiful cemeteries we have here and, if your interested, a time-lapse over the same cemetery.

This image was made from three photos. A main photo which included the foreground, most of the light trails and the mid-ground. The second photo was taken five minutes before the main photo and used to replace the sky. And the third photo was used to add light trails at the bottom left of the road and over the ghost cars. The blending was done in Photoshop and the editing in Lightroom.

Though I wanted a blue hour image, I start shooting at sunset and straight through blue hour. Glad I did because the photo I used for the sky was shot at the end of golden hour and the beginning of blue hour. Two out of the three images were 30 second exposures and I achieved that by using LEE Filters’ Little Stopper, a 6 stop neutral density filter. I needed the Little Stopper to get the light trails but as you can see in the photo, the cars were stopped long enough to be captured as ghosts. Love that effect though.

As I mentioned above, I think a better shot would be from the other side of the roundabout but I also think a higher perspective and wider angle lens would make for a better, more captivating image.

 
LOVERS BAY ROAD LOOKOUT

I’ve been talking about Baie des Tortues (Turtle Bay) on my last couple of posts and once or twice before that, but they’ve been detail photos, except for one that was taken from this exact spot but at night, so I thought I’d share a day image of the beach of Baie des Tortues (Turtle Bay).

The luck I had was that it was almost low tide when I took this shot, revealing the tunnel of the cliff, the Pierced Rock (la Roche Percée). Situated smack bang in the middle of the image with it’s own tiny beach in front of the entrance. At low tide you have access to the tunnel from the beach. The hole goes straight through the cliff to the other side where you join the other beach and peninsula, la Roche Percée, which you can see behind the cliff and to the right of the image. The tunnel is quite narrow and is part of the Sentier des Trois Baies (the Three Bay Trail) which includes Baie de la Roche Percée (Pierced Rock Bay), Baie des Tortues (Turtle Bay) and Baie des Amoureux (Lovers Bay). A beautiful walk if ever you have the time.

The beach behind the cliff is where I took the photo from my last post, Le Bourailais. This rock formation at the end of the cliff, known as le Bonhomme (the Man), is a landmark in New Caledonia with spiritual importance in Kanake culture. Hop over to my last post for more information on the Bonhomme de Bourail.

On the left side of the Roche Percée (Pierced Rock) cliff is an amazing 280° lookout point with a shrine dedicated to Notre Dame des Flots (Our Lady of the Waves), who watches over the ships. Magnificent views up there.

And of course, just below that is the beach of Baie des Tortues (Turtle Bay). Well known for it’s turtle nesting season in late January, early February. A beautiful little beach, very popular with the locals and tourists for picnicking. Not a bad spot for a romantic sunset either.

This shot was taken from the Route de la Baies des Amoureux (Lovers Bay Road). This small section of the road is part of the Sentier des Trois Baies (the Three Bay Trail), mentioned above. Two photos were taken to make this image. A long exposure of 10 seconds to smooth out the clouds and water, and a shorter 1/8th second exposure to capture the cliff side when the sun shone on it. It was cloudy and rain was on it’s way, as you can see from the top left of the image, but the sky opened long enough on the horizon to provided me with this beautiful light. I blended the 1/8th exposure on to the 10 second exposure in Photoshop and finished editing in Lightroom. Mainly just accentuating the cliff side, beach and water.

So there you go, the gorgeous Turtle Bay in Bourail, New Caledonia. This whole area is worth a visit if ever you’re round the corner.

 
BLUE TURTLES

Though I don’t take enough of them, I do love long exposures. The effect it has on the elements, the mood it gives a scene, how it can transform the ordinary into the surreal and the way it shows time differently. Here is an example of what I’m talking about.

This is the north end of Baie des Tortues (Turtle Bay) located in Bourail next to La Roche Percée (Pierced Rock). Only a two hour drive from Noumea, the Capital of New Caledonia. This area is very popular with tourists and locals and renowned for two landmarks, the Roche Percée (Pierced Rock) and the Bonhomme (the Man). The Roche Percée is a peninsula and a detached suburb of Bourail, known as one of the only surf spots in New Caledonia. And, it is also a cliff with a hole that runs through it from the Roche Percée beach to Baie des Tortues beach, accessible only at low tides. The Bonhomme is a huge monolith of hard quartz sculpted by the waves to resemble a man’s head wearing a hat. Those same waves render it vulnerable as they erode the base threatening it’s collapse. The waves have already eroded a good part of the cliff mentioned above. A yearly phenomenon also occurs on these same two beaches in late January, early February… turtle nesting season.

The nesting season was one of the reasons we were up here and photography was another of those reasons. We’d decided to go for a stroll along the beach of Turtle Bay and maybe capture a sunset. No such luck with that but I did come home with this blue hour photograph. The two minute long exposure turned this frantic scene of choppy waters and threatening clouds into a calm, tranquil, minimalist image. Even the colours are minimal with their tones of blue and the faint touch of orange/red in the sky. The two minute exposure wouldn’t have been possible without the Little Stopper, a 6 stop neutral density filter, from LEE Filters. Without it, only a two second exposure was possible and wouldn’t have given me that misty water and silky smooth clouds. Except for a lot of cleaning up, there was very little editing done. I did edit a black and white version but I felt the contrast was too harsh and thus stuck with the subtler blue tone version.

I’ll edit a photo of the Bonhomme I took about a week before this one and share it on the next blog post. Hope you’ll check it out. Ciao for now.

 
THE SOUTHERN WAY

La Roche Percée, Bourail

Second week of our slow exit from confinement and people are starting to forget to implement the protective measures that are still very important.

Back in October I wrote a blog post about getting a new camera setup and trying astro-photography. This is one of those photos I captured. I’ve looked at this photos a few times but it was only on my last edit check that I realised I had captured, not only, the Milky Way but the Southern Cross as well. And that’s because of the research I did for a recent blog post, Celestial Confinement, where I learned to use Alpha Centauri AB and the Southern Cross to find the South Celestial Pole.

In January of last year, I spent a few days with my friend, who was minding a house here, at La Roche Percée. Located on the coast of Bourail which is about a two hour drive north of Noumea. It’s a very popular area with one of New Caledonia’s renowned landmark, Le Bonhomme. Plenty of accommodation, from camping to four star hotel, around the area. Lots to do as well.

It was turtle nesting season and I went out in hopes of seeing baby turtles. No such luck but since there was a fairly clear sky filled with stars, I decided to test my new camera setup (the Sony A7 III with the Tamron E 28-75mm ƒ/2.8 Di III RXD lens) and my hand at capturing the night sky. I admit, I could’ve taken my time to find a better foreground interest but, in my defence, I just wanted to see how well I could capture the stars with my setup.

I hadn’t planned this shot at all. It was a spur of the moment thing when I saw the Milky Way above me. So I set my tripod right where I was and took several exposures with different settings. I noticed the longest exposure I could take without creating star trails was 15 seconds with an ISO of 6400. A longer exposure would create oval shaped stars, especially in the corners, the beginning of star trails. This shot is a 10 second exposure with ISO at a whopping 12,800. Not necessary at all but I wanted to see the amount of noise I’d get with a long exposure. Very little noticeable noise in the sky though very noticeable in the foreground. For best results, a second, very long exposure would’ve been needed for a cleaner and brighter foreground.

I looked at a lot of tutorials on how to edit the Milky Way and it took me a long time and many trials before finding my own editing process and achieve something I was happy with. No fancy Photoshop edit, just some Lightroom brush work.

It was once the photo was ready for sharing that I recognised the two bright stars of Alpha Centauri AB at the bottom of the Milky Way, and the Southern Cross just above it. I was so stoked. This, of course, was thanks to research I did a few weeks ago for my blog post Celestial Confinement. I have to say, this photo means a lot more to me now.

I got a little too excited and provided the illustrated photo to the right for those who are not into astrology. I hope you find this fascinating though or, at least, interesting. Especially for you amateurs and enthusiasts out there, who are getting into this kind of photography. Taking beautiful photos is great but having knowleadge what you’re I think it gives more meaning to your photos. Let me know what you think over on Twitter at @Hervouet.

Now please everyone, whether you’re still in auto-confinement or not, make sure you’re implementing the protective measures of washing hands, social distancing, no touching, coughing and sneezing in your elbow and when possible wear a mask and gloves. Stay safe.


SONY a7 III

A full-frame, mirrorless DSLR from the Sony Alpha series cameras.

TAMRON STANDARD ZOOM LENS

Tamron E 28-75 mm ƒ/2.8 Di III RXD standard zoom lens for E-mount cameras.

VANGUARD TRIPOD

Vanguard VEO 235AB 5 section tripod with TBH-50 ball head.

L-BRACKET

L-bracket / plate for Sony Alpha series cameras.

SANDISK EXTREME PRO

128GB Extreme Pro SDXC memory card from SanDisk.

LETMY HEADLAMP

LED headlamp from Letmy with white and red light.

 
DREHU VILLAGE POOL

Wé, Lifou

27th and last day of confinement.

Almost three years ago now, I had the honour to photograph my cousin’s wedding in Lifou. We spent five days in total to, not only, photograph the administrative, religious and traditional wedding but also photograph and visit this beautiful Loyalty Island, that is Lifou. We stayed, here, at the Drehu Village hotel in Wé, the capital of Lifou. I’ve got a few more photos over on my profiles Facebook, Instagram and Flickr if you’d like to see more of Lifou.

The Drehu Village hotel offers a couple of suites and 28 bungalows. They’re clean, comfortable, spacious and quiet. The bar area, just off to the right of this photo, doubles as the breakfast area. The restaurant, to the left with the green and purple lights, serves delicious and beautifully presented meals made from fresh, local ingredients. And of course, a pool. The staff are kind and their services efficient. Different activities are also available along the gorgeous beach of Chateaubriand Bay, where the hotel is located. Nothing bad to say about this hotel, really. You can even get good deals all year round.

This is a HDR (High Dynamic Range) image comprising of five exposures of two to thirty seconds. They were taken with a great little point & shoot camera, the Panasonic Lumix LX100. I’d bought it, after I had all my gear stolen, just to have a small camera to shoot with while saving for a DSLR. And yes, I photographed the wedding with it. Back to the image, composition-wise, I should’ve framed to the right a touch to included more of the bar area. And also towards the end of blue hour for a more pleasing image with the complimenting colour in the sky. Apart from those things I’m quite happy with it and quite surprised at the quality of the end image. The five long exposures were blended and edited in Lightroom with a number of local adjustments. Clarity and highlights on the wood panels in the foreground and the swimming pool. Colour correction at the bar and the restaurant. And a bit of Defringe in the sky and the roofs. I’m pretty happy with this image.

The Panasonic Lumix LX100 has it’s limits but within them, it produces amazingly good images which means you can take great photos with it. It’s got full manual controls, a Leica lens and can shoot 4K video. This camera is great for someone who’s looking for a fairly compact, point & shoot system and would like to get off Auto and into Manual shooting. Or even someone who shoots Manual but wants a compact point & shoot camera. Looks pretty stylish too, in my opinion.

So, I hope everyone’s is dealing well with confinement and using this time to improve your skills in whatever you’re interested in or learning new skills. There’s no better time for it. Starting tomorrow, here in New Caledonia, we’re slowly coming out of auto-confinement. Great for morales and the economy. But, that doesn’t mean everything is back to normal. On the contrary, it is more important than ever to follow the strict measures or protection. The distance between each other, washing our hands regularly for at least 20 seconds, coughing or sneezing into our elbows and, if possible, wear a mask. Any mask. And please, protect yourself, those you love and others by staying safe at home.


PANASONIC LUMIX LX100

12.8 MP point and shoot camera with 4K video

VANGUARD TRIPOD

Vanguard VEO 235AB tripod with TBH-50 ball head

SANDISK MEMORY CARD

SanDisk Extreme Pro 128 GB class 10 SDXC memory card

THINK TANK MEMORY CARD CASE

Think Tank Photo Pixel Pocket Rocket SD memory card case

GIOTTO LENS CLEANING KIT

Giotto rocket air blower, fine dust brush, rounded & pointed tips cotton buds, microfibre cloth and cleaning solution

WANDRD PRVKE

WANDRD PRVKE 31 lt. travel and camera backpack

 
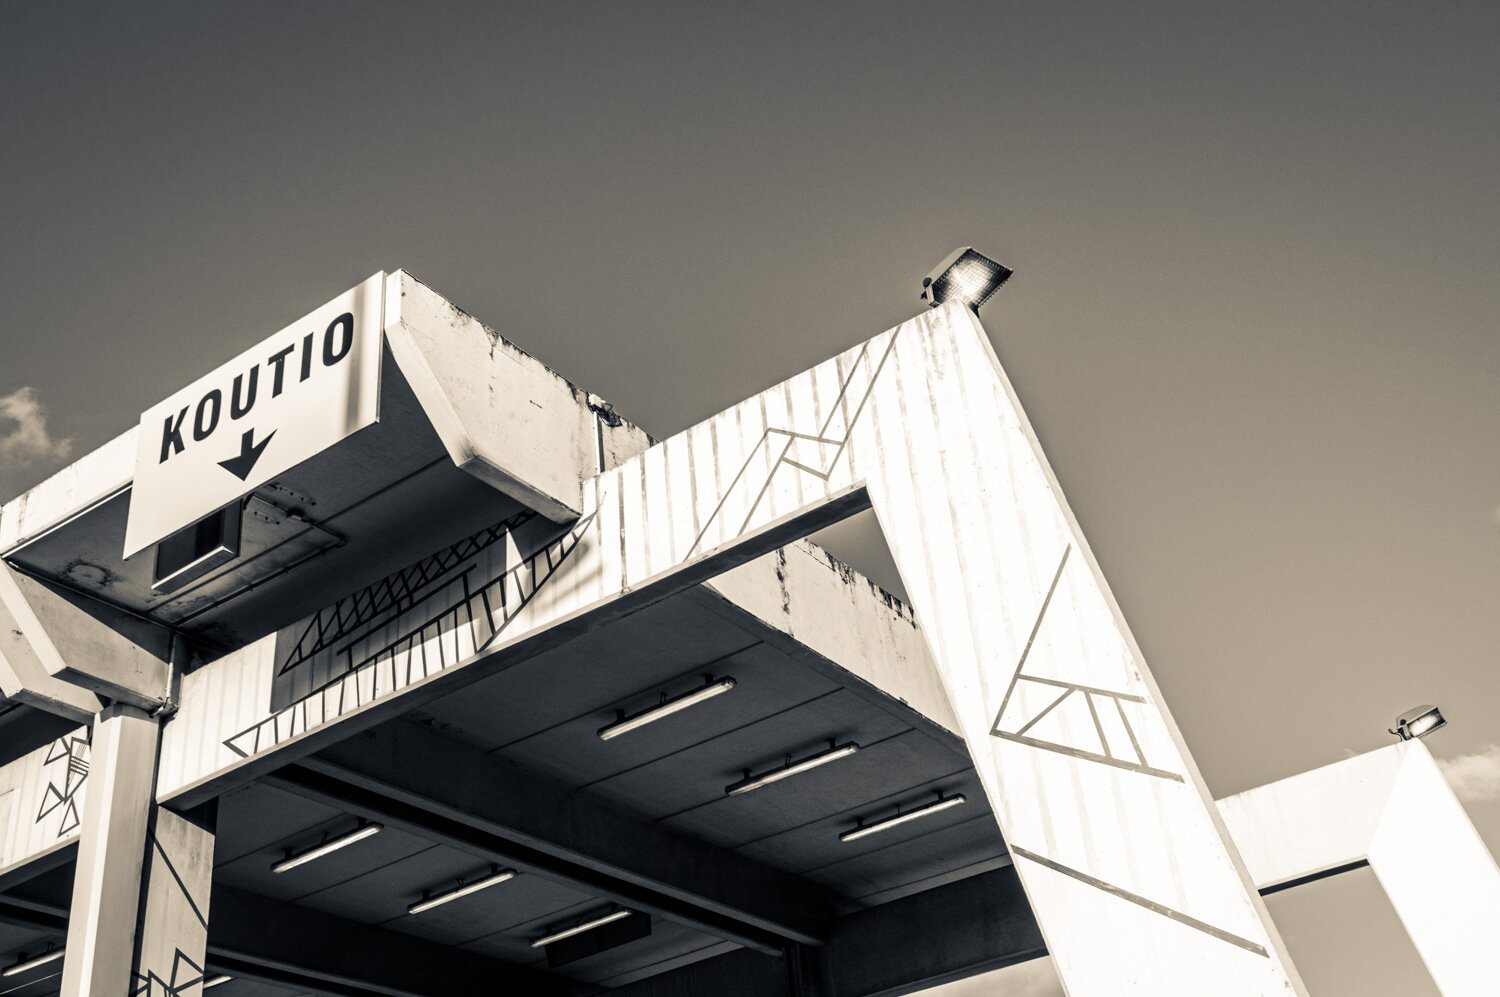
THE OLD KOUTIO TOLLS

L’ANCIEN PÉAGE DE KOUTIO

Koutio, Dumbea

Doing just fine on this 13th day of auto-confinement.

Glad I came across these photos because it documents an era in New Caledonian history, road tolls. I’ve even had a hard time finding relevant information and there aren’t a lot of photos either. So I’m glad I can share something that doesn’t exist anymore.

The Voie Express no.2 (E2) or, more locally known as, Savexpress is a highway that expands from Dumbea to Païta. The highway opened in 1979 and the tolls a year later, they provided a rapid entry/exit into Noumea from the north. After 33 years in operation, the toll gates closed at the end of 2013 and were destroyed in 2014, only a few months after these photos was taken.

Quite controversial since it’s opening, users on one hand cut travel times down dramatically but, on the other, would spend on average $150-$200 a month for the privilege. A couple of years before it’s destruction, there were talks of moving it farther north toward the international airport La Tontouta. In the end they decided to get rid of the tolls altogether.

My Fujifilm FinePix S9500 died on me a few months earlier but I was very lucky to have a colleague and friend, Tony, not only lend me his Nikon D3200 with the kit lens but also suggest I photograph the structure before it disappeared forever. Thank you very much Tony.

I edited the very first photo (top of page) multiple times over the years without satisfaction. I’ve learnt a lot since 2014 and, not long ago, I realised I was over doing it with the edits. Since my research on the subject, I decided to use these images to document an era in New Caledonian history. The top image is in colour because the contrast of colours work well together between the tolls and blue hour. The other photos, I felt, looked better desaturated with one of my split-tone presets applied. Actually, I like to edit a lot of old structures and things this way. It does depend on the image, of course. For example, colour didn’t bring anything special to these ones. The slight vintage look though changes to mood, put more emphasis on the structure and/or scene.

I’m sure these photos bring back a few souvenirs and stories amongst some of you. And for others, absolutely nothing but a part of history you’ll never know. I hope everyone enjoys the photos.

Once again, protect yourself and others by staying home. Wash your hands, keep your distance, sneeze and cough in your elbow… you know what to do. If we all do our part, we’ll beat this Covid-19 a lot faster. Stay safe everyone.


NIKON D3200 + KIT LENS

Nikon D3200 crop sensor DSLR with standard zoom Nikkor AF-S DX 18-55 mm ƒ/3.5-5.6G VR lens

VANGUARD TRIPOD

Vanguard VEO 235AB tripod with TBH-50 ball head

SANDISK EXTREME PRO

SanDisk Extreme Pro 128GB SDXC Class 10 memory card

GIOTTO LENS CLEANING KIT

Giotto lens cleaning kit including brush, blower, microfibre cloth, rounded & pointed cotton tips and cleaning solution.

JJC REMOTE SHUTTER RELEASE

JJC wired timer/shutter release (not compatible with the Nikon D3200)

WANDRD PRVKE BACKPACK

PRVKE 31 lt. travel/camera backpack from WANDRD

 
ATCHU KAYAKS

Kuto, Isle of Pines

A beautiful morning on Isle of Pines, also known as the Island Closest To Paradise. My night photography wasn’t a big success but this sunrise shot from the beach at Atchu Camping is probably the best image I came home with. Once again, not a soul on the fresh, breezy beach.

I don’t think my night photography wasn’t a failure but judge for yourself, checkout my blog posts Atchu Way and Starry Atchu. It was a beautiful morning with a fresh breeze and cool sand between my toes. Apart from the tiny waves crashing on shore, it was very calm and tranquil. A very relaxing moment alone, watching the sun rise. It didn’t look like there was going to be a colourful or dramatic sky and there wasn’t. I captured this brief moment, just before the sun rose above the horizon, thinking there may not be another opportunity. And I was right. Once the sun showed itself, all colours disappeared apart from the blue sky which stayed all day.

I went with quite a long exposure of a minute and a half to get those clouds streaks and silky smooth water. The Lee Little Stopper (6-stop Neutral Density filter) helped me achieve that exposure and the Lee Polariser filter helped reduce glare on the water and pop the colours a touch too. Love the colour of that water. In fact, the filters inverted the movement in the scene. The water was a little choppy and the clouds were moving very slowly. The filters changed the motion and mood of the scene, making this image calm and tranquil yet giving the notion of time passing by. Editing was minimal, using mainly the Basic panel and the real magic happen within the Calibration panel, where I accentuated the colours. Ninety-five percent of my editing is done within Lightroom. I love it when I don’t have to spend a lot of time editing.


SONY a7 III

full frame mirrorless camera (body only)

TAMTON E 28-75mm ƒ/2.8 Di III RXD

standard zoom, E-mount lens

VANGUARD TRIPOD

VEO 235AB Tripod with TBH-50 Ball Head

LEE FILTER HOLDER

100mm square filter holder system

LEE LITTLE STOPPER

ND1.8 (6-stop) neutral density filter

LEE POLARISER

100mm polariser filter for Lee Filter Holder system

 
THE ISLES OF ATCHU

Kuto, Isle of Pines

Nearing sunset, I decided to head down to the beach to find a potential photo. Hoping for some colour in the sky even though the beach faces east. No colours or dramatic skies but I came away with this photo as I was trying out my filters before the sun set.

The beach at Atchu Camping is small, about 50 metres long, and has a lot of seaweed and algae on it’s powdery white sand. Though secluded and isolated, it’s only seconds away for users of the campsite. We were there for five days and rarely saw someone on the beach let alone in the water. I have to admit, we didn’t swim there either but did stroll along a few times. The beach faces east, great for sunrise or front lit scenes like this one. And the two isles in the distance just add to this paradise scene. Isle Adventure is largest of the two and spans from the right to behind Isle Duroc, which is small, round and in front of it’s big brother. I’m on the far north end of the beach here and like the southern end, it’s dead coral. You can only get here by sea or through Atchu Camping.

I got here half hour before sunset and stayed almost half hour afterward. This was the best shot I came away with. It’s actually a blend of two images to get sharpness throughout the image. One focused on the foreground and the other on the islands in the background. To get the long exposure of 15 seconds, I had to use my Little Stopper (6-stop filter) because it’s always windy here so the water is a little choppy. I also added a 3-stop ND soft grad. filter to control the bright sky and a polariser filter to cut the glare on the water’s surface. It also adds a bit of saturation to the water and sky. Editing was done in Lightroom except for the blending of the two images which was done in Photoshop. As I’ve mentioned in previous posts, the Calibration panel in Lightroom can do wonders to images when used right. There’s a small learning curve but once you get it, you’ll use it often. Especially on landscapes images. Try it out.


SONY a7 III

full-frame mirrorless camera (body only)

TAMRON E 28-75mm ƒ/2.8 Di III RXD

standard zoom, E-mount lens

VANGUARD TRIPOD

VEO 235AB Tripod with TBH-50 Ball Head

LEE FILTER HOLDER

100mm filter holder system

LEE POLARISER

100mm polariser filter for LEE 100mm filter holders system

LEE GRADUATED FILTER

ND.9 (3-stop) neutral density soft graduated filter

 
ATCHU WAY

Kuto, Isle of Pines

I got this shot only a few minutes after my last shot. Not quite satisfied with the scene, I switched my attention to these pine trees and thought it would make a nice image with the stars above it. Little did I know I’d capture part of the Milky Way.

As mentioned in my last post, I was hoping to capture the Milky Way over Adventure Island from Atchu Camping. The centre of the Milky Way was too close to the fairly bright horizon to be seen. The sun rises from the same direction and the two hour window before hand wasn’t enough to capture it over the island. Turning my attention about forty degrees to the right, I was able to capture a part of it higher in the sky. To my surprise, as I couldn’t see it with my eyes. Though very happy I capture the Milky Way, it wasn’t my intention on this photo. My attention was captured my the three pine trees pointing up towards the stars. To me, it made for a better composition than my previous photo. And, as with the last photo, it wasn’t taken at dawn but only ten minutes after the first shot at about 2:50 am.

If you’d like to know more on Atchu Camping, check out my blog post To Atchu Beach.

Editing took a little longer on this image. Trying to bring out the Milky Way as much as possible without over doing it, was difficult. A Graduated Filter loaded with Clarity and Dehaze can do wonders but dodging and burning with the Adjustment Brush helped too. The rest of the image was fairly straight forward in regards to editing.


SONY a7 III

full-frame mirrorless camera (body only)

TAMRON E 28-75mm ƒ/2.8 Di IIIRXD

standard zoom, e-mount lens

VANGUARD TRIPOD

VEO 235AB Tripod with TBH-50 Ball Head

L-BRACKET

quick release Arca-Swiss L-plate for Sony Alpha series cameras

SANDICK EXTREME PRO CARD

128GB SDXC memory card

HEADLAMP

Letmy headlamp with white and red Light

 
THE BREAKTHROUGH OF DAWN

La Roche Percée, Bourail

This time last year I was at La Roche Percée with a friend who was minding a house just beyond those trees on the far side of the beach. I took advantage of the opportunity to try out the Sony a7 III with the Tamron E 28-75 mm ƒ/2.8 Di III RXD standard zoom lens, that I had bought the month before. No dramatic nor spectacular sunrise that morning but, nonetheless, came away with this tranquil black & white image.

To get to La Roche Percée, you need to go to Bourail first, which is about two hours drive from Noumea, on the west coast. From there you head west by making a left turn onto a road situated just after the bridge (at the entrance of Bourail village) and opposite the Hotel La Nera. Then just follow the road till you see a sign for La Roche Percée and the Bonhomme de Bourail. There’s also a sign at the bridge for the turn off. The Bonhomme de Bourail is a landmark in New Caledonia and so is the beach but also the, actual, pierced rock. A cliff side situated next to the landmark with a, well, whole in it. At low tide you can walk through to Turtle Bay on the other side. The far end of La Roche Percée is popular with surfers and boogie boarders. It’s one of the rare beaches in New Caledonia to have waves. Another reason for me being here, apart the one mentioned above, was the hope to see, at least, one turtle lay her eggs on the beach. It was the time of season and the peninsular is THE place for this event. Up to three hundred turtles have been recorded to nest here in one season. Just amazing. Apart from seeing a few nests around, I didn’t see any turtles at all. My friend and her kids, on the other hand, saw baby turtles race to the water. So lucky. Yes, I’m jealous.

Because it had been raining on and off for the last few days, I had hopes for a dramatic sunrise. Of course, it was nothing of the like. Apart from a few clouds rolling in from the east, it was clear skies everywhere else but I took a few photos nonetheless. For this image I used the Lee Little Stopper (a 6-stop Neutral Density filter) to get a long exposure and a Lee ND.9 Soft Grad. (a 3-stop Neutral Density soft gradient filter) to tone down the bright sky. I don’t have a lot of filters and this was probably my second time using them. I had to try them out and get used to them if I want to take full advantage of it. I was pretty happy with the results. I didn’t do a lot of editing, just adjusted my White Balance before converting to black & white then I just dropped the Highlights and brought out the Shadows. Brushed a bit of Texture over the rocks in the foreground to make them stand out more and a Radial Filter with a bit of Exposure to lighten up just a touch the bottom two thirds of the image. That’s it.

The black & white conversion made for stronger and prominent features. In colour, the image was bland and not very pretty. The conversion also seem to make the image more peaceful, isolated, minimalist. There’s nothing great about this shot but there’s something about it that makes me like it.


SONY A7 III

24MP Full-Frame Mirrorless Camera (Body Only)

TAMRON 28-75MM Ƒ2.8

Sony E-Mount Lens

LEE LITTLE STOPPER

6-Stop Neutral Density Filter

LEE FIRECREST ND.9 SOFT GRAD

3-Stop Neutral Density Soft Gradient Filter


LE ROOF IS ON FIRE

Ouen Toro, Noumea

Another oldie I found in my collection. This one dates back to 2014 when I was using the Nikon D7100 with the Nikkor 18-105 mm. Again, I was trying my hand at long exposures. I’ve always liked this image but had completely forgotten about it. Goes to show you, it’s worth going back through old image catalogues. You never know what you’ll find.

The photo was taken from the well known Anse Vata Beach and what you’re looking at is Port Bélandre. It has three establishments, the classy restaurant Le Roof, Pop Light nightclub and to the left edge of the image is the bar/nightclub La Bodega Del Mar. The Pop Light nightclub has been refurbished to become the XO Club and opens before sunset whereas before it opened at 10 p.m.. La Bodega and XO are very popular night scenes in Noumea. I’ve never had the chance to try out the restaurant but from what I hear it’s very good. Oh and the women receive a menu without prices on them. Don’t forget your credit cards fellows. A little information you probably don’t want to know is the channel of water between the two rock stacks is actually a sewage outlet. Yep, and some people fish here. Would you?

Though I used all three exposures (2 stops apart) for this HDR (High Dynamic Range) image, I only really needed the 10 second exposure to get the same results. Well, technically, you would need a second image exposed for the “restaurant” sign of Le Roof to avoid the over-exposure of it in this photo but at the time I was more after a silky smooth lagoon than anything else. The images were blended and edited in Lightroom. As you can see by the red horizon, the photo was taken at the very beginning of blue hour. Which means it was brighter outside than the image shows. And that’s a creative decision I took. I wanted a slightly darker, contrasted and moodier image. And I think I’ve achieved that here.


NIKON D7100

24MP DSLR camera (body only)

Nikkor AF-S DX 18-105mm f3.5-5.6G ED VR

APS-C crop sensor lens


HAPPY HOLIDAYS

Place de la Marne, Noumea

I hope everyone’s had a fantabulous Christmas. Wishing you all a safe and memorable holiday season. May the joy and happiness continue through to the new year.

This is  another photo taken at La Place De La Marne. I prefer the Christmas tree in this photo than in my last post. Maybe because it seems more traditional in green. Another long exposure, 5 seconds this time at an aperture of ƒ/11 and ISO 100. A vertical shot which I like quite a bit. I left out all the distractions and captured just the tree and it’s illuminations. I got this shot at the very end of blue hour and was lucky no one was in front of me. Post-processing was very basic too. Nothing fancy, brought up the Shadows, dimmed the Highlights slightly, a bit of Texture and Clarity, a slight Camera Calibration and that’s it. Quick and easy. Very glad everything was captured in-camera.

Take care over the holidays everyone. Have fun but be careful on the road and, please, don’t drink and drive.

TRANQUIL LEMONS

Noumea, New Caledonia

I was doing a bit of cleaning up in my Lightroom catalogue and came across this photo. It dates back to March 2018. I was using a Canon EOS 1300D with a kit lens that I had won in a photo competition. I remember I was out at La Baie Des Citrons (Lemons Bay) trying to capture a sunset. Nothing spectacular happened but I stayed through blue hour trying long exposures.

Blue hour, on the other hand, was beautiful. With everything blue, I remember imagining this photo in black & white before I even took the shot. I wanted a long exposure so I went with the maximum the camera would allow without a remote, which is 30 seconds. To get the cleanest image possible, a very low ISO is necessary, in this case 100. An aperture of ƒ/6.3 gave me the exposure I needed to capture the photo I wanted. The thin clouds are totally smoothed out, the water as well though it was already pretty still. Plain and simple.

Post-processing was a matter of simplifying the image further. Getting rid of all distractions like buoys, sail boats, birds, stars trails and dirt spots from my lens. All that’s left is the ruins of a wharf and the marker, perfect. That’s exactly what I wanted, a minimalist image. I might get this one printed.

All my research about this dilapidated wharf were in vain. The remnants show it used to start from the Four à Chaux (Lime Kiln) of La Baie des Citrons. I’m guessing it may have something to do with that. I would love to get some information on it so if anyone knows something, please drop me a message over on Twitter (@Hervouet) and I’ll update this post with the info. Thank you.

THE MAN BETWEEN THE MILKY WAY AND TURTLE BAY

Bourail, New Caledonia

When I got my new camera, the Sony a7 III with the Tamron 28-75, at the end of last year, I was eager to try my hand at astrophotography. I wanted to capturing our Galaxy, the Milky Way, in all it’s glory. The opportunity came in early February when my best friend, Géraldine, was minding a house in Bourail. A two hour drive from Noumea. A beautiful little beach-house situated only metres from the Roche Percée Beach. So I stayed there over two weekends, wandering off in the middle of the night, shooting the stars. I was quite lucky to have clear skies and the Milky Way close to where I wanted it. Especially for an unplanned shoot.

The very first thing I realised was that 28 mm wasn’t wide enough. I needed a wider lens, 21 maybe even 18 mm, but it’s all I have so I had to make do. I didn’t count on the moon rising from that direction either. And almost a full moon too. Not to mention the very bright star/planet but, that, I actually like. It took me a few trials and errors to get the exposure I needed to avoid star-trails. For this scene it was around 5 to 8 seconds of exposure with an ISO of 6400 and a wide open aperture of ƒ/2.8. It’s the best image I came home with, out of the half dozen I took over the two weekends. It’s not a large portion of the Galaxy but I’m happy with it yet definitely not satisfied with the results. I had a very hard time editing it and had to do some research on post-processing these kinds of images. I need more practice and experiment more with astrophotography. Never stop learning, right?

The beach at the bottom of the image is Turtle Bay and behind the cliff is Roche Percée Beach (very popular with surfers). Both are well known for turtle hatching which we were right in the middle of. Unfortunately, I didn’t see any but Géraldine and her two girls did. Every year, hundreds of turtles lay their eggs here, which produce thousands of baby turtles. It takes 45 days for the eggs to hatch so both beaches are patrolled every night for about six to eight weeks. Making sure the turtles, the nests and babies aren’t interfered with in any way. Keeping this area a sanctuary for these incredible creatures.

Carved from the natural erosion of the waves, the weird looking rock formation at the end of the cliff is Le Bonhomme. A landmark in Bourail and New Caledonia. There’s a lookout at the top of the cliff but unfortunately part of it is closed off now due to erosion at the base causing the edge to collapse. Still worth the walk or drive up there as the views are just magnificent.

I haven’t had the chance to photograph the stars since but I hope to in the next month or so. Fingers crossed.

28 mm, 5 seconds @ ƒ/2.8, ISO 6400

RAINBOW LIBERTY

Odaiba, Japan

Situated on the artificial island of Odaiba in Tokyo Bay, this replica of the Statue Of Liberty was originally a temporary fixture for The Year Of France In Japan in 1998-99, a celebration of the two countries relations. Her popularity though won her a permanent return in 2000. Standing at 11.5 metres hight (1/7th of the New York original) and weighing 9 tonnes, the statue is impressive and beautiful. Lady Liberty is not an only child though, she has a sister in Shimoda and another in Osaka but neither with such magnificent backdrops.

And talking about backdrops, the Rainbow Bridge is the best way onto the island. Opened in 1993, Shuto Expressway No. 11 Daiba Route is the official name of the bridge. Named Rainbow Bridge by the public, I’m guessing, because of the multi-coloured lights cast on it at night. We took the Yurikamome to get to Odaiba. It’s like a train but with rubber wheels and guide-rails. Completely controlled by computers and there are no drivers onboard. The ride was petty smooth and quite fast. Lots of fun.

We arrived at blue hour and only a green light was cast underneath the bridge with white on the towers. Though we took photos till dark, an hour after sunset, the bridge didn’t live up to it’s name. Well, I say that but maybe it did. We went elsewhere where the bridge wasn’t visible and came back over it around 11:30 pm so it may of lit up in the meantime. Where did we go? Find out on the next post.

Not the best framing but the best I could do while it was still blue hour. There were a lot of people around so I couldn’t pick the perfect spot and didn’t have much time to look around either. A single five second exposure with minor editing and a very subtle Orton Effect added. I think if the bridge was lit like a rainbow, it would’ve given a very different mood to the photo. A festive feel rather than the peaceful mood this image has. I like it.

75 mm, 5 seconds @ ƒ/11, ISO 100

SHINJUKU PARK TOWER

Tokyo, Japan

Tokyo skyline from the Metropolitan Government Building in Shinjuku. Amazing views, almost 360º. Even though there was a long queue and bag search before entering the elevator, we got up there fairly quickly and just in time for blue hour. The observation rooms huge and there a cafe in the middle. Worth going up if ever in Tokyo.

I’m not certain that all three of the buildings in this image are named the Shinjuku Park Tower because the Park Hyatt Tokyo is located in these towers too. What grabbed my eye to this scene was the roads that winds behind the towers which adda a colour contrast and helps lead the eye of the view into the image. It was a little challenging shooting this photo, actually all the photos, as there was a lot of reflection from inside the observation room. I set my tripod and camera as close as possible to the window, framed and set the exposure then used the 10 second self-timer to give me enough time to wrap my jacket around the camera and up to the window to avoid any reflection off the glass. It also gave the camera enough time to stop vibrating from the jacket being placed around it. The result, no reflection, sharp and a very happy me.

In regards to post-processing, I cooled the image quite a bit to represent what I saw at the time and added the Orton Effect to the three towers and the orange roads that wind around them. The Orton Effect adds a glow to an image or part of an image. It’s the first time I’ve actually used it and, to tell you the truth, I’m not sure if I like it or not. The towers seem slightly blurry even though they aren’t. I know it’s an effect primarily used on landscape photography to give a dreamy look and feel but I’ve seen it used in other genres too, like back-lit street photography, with great success. So there is a use case for it, I just have to figure out in which cases.

28 mm, 15 seconds @ ƒ/11, ISO 100

PORT OF KOBE

Kobe, Japan

We arrived in Kobe late afternoon and the last bus towards the hotel had already gone. Though we were tired, we decided to walk 20 minutes to get there. A nice walk through the city which made us realise there was a lot to see here. By the time we got to the Meriken Park Oriental Hotel, the sun was just about to disappear below the horizon. What a beautiful surprise when we opened up the curtains to the balcony of our room and saw this gorgeous view. You may have seen one of the photos in a previous blog post.

I quickly setup my gear and started shooting. Single exposures first then once blue hour was over I took a 180º panoramic view. We had arrived just in time to capture these images. So on the left we have Notre Dame Kobe hotel, Port Of Kobe tower, Kobe Maritime Museum, behind that the Hotel Okura Kobe and in front of all that the Meriken Park. You can also see the Bell Of Hortensia and Starbucks right next to it on the bottom right of the image. And not to forget, the cityscape of Kobe in the background.

28 mm, 5 seconds @ ƒ/11, ISO 100

O-TORII BLUES

Miyajima / Itsukushima Island, Japan

I got up very early this morning with hopes of capturing the Grand Torii of Itsukushima Shrine at high tide and I wasn’t disappointed. Not quite a full high tide but enough for me to capture the image I wanted. Without a soul around, I had this whole area to myself for about an hour before I saw a local woman doing her morning walk. It was so quiet and peaceful. And beautiful.

I’ve posted a sunset photo of this torii if you want to check it out.

Blue hour is the only time of day where everything is equally exposed. So I didn’t need multiple exposures nor filters for this image. My objective was a long exposure with lots of breathing room around the subject. People who’ve seen this Grand Torii for themselves, will tell you this photo doesn’t show the grandeur of the gate. And they are right but it wasn’t my objective here.

I have photos with people at the base of the torii and if you’d like me to post the photo, head over to my Facebook or Instagram profile and let me know in the comments below this photo.

28 mm, 30 seconds @ ƒ/2.8, ISO 50

ITSUKUSHIMA TOWN

Miyajima / Itsukushima Island, Japan

The staff at Hotel Kikunoya, where we stayed, were very friendly and helpful. Really can’t say enough great things about this place. They have their own onsen and restaurant. We had dinner in this street though, in Itsukushima Town. The town pretty much shuts down after sunset and only a small handful of restaurants stay open for tourists. It looks very empty here but I promise you it’s packed with tourists and locals during the day. We wandered down this little street and ultimately back up to a restaurant called Mametanuki. The owner speaks English and is, maybe, British but the restaurant is very much Japanese.

Though this is a long exposure photo, I had a couple walk in the frame and stopped just long enough to appear as ghost figures. So I used the first shot I took of the street to mask them out of the frame. Otherwise, it’s a single exposure.

It’s these types of streets and alleyways that really make me feel like I’m in a different country, a different world. We both wished we’d organised, at least, two nights here. So much to see and visit.

41 mm, 25 seconds @ ƒ/11, ISO 50

ITSUKUSHIMA SHRINE

Miyajima / Itsukushima Island, Japan

Check out my last post if you haven’t seen the torii to this magnificent Itsukushima Shrine. When we arrived for sunset, I was a little disappointed to see it was low tide but glad it was for this shot. Though my friend was cold and we were hungry, we stayed a little longer after blue hour to capture more images. We were only here one night thus wanted to make the most of it. I wanted a centred composition with the reflection but to get it I had to get my feet a bit wet. Well, I tried to avoid it but it was a failed mission. I got the shot I wanted and that’s all that counts.

I have to say I’m blown away by my new camera and lens. It took me a long time to get it but the combination of the Sony a7 III with the Tamron 28-75 mm ƒ/2.8 is just awesome. In regards to this photo, though taken a 30 seconds and ISO 50, the raw file was very dark. Everything behind the shrine and the foreground was in darkness. The dynamic range on the raw file was amazing. I was able to bump up three stops of light noise-free without loosing any sharpness. I’m literally blown away by this camera lens combination and the quality of the images.

28 mm, 30 seconds @ ƒ/11, ISO 50